
Many of us are already preparing for a smaller Christmas this year as covid restrictions are likely be in place, and many cooks may now only be catering for the immediate household.
With the possibility of fewer mouths to feed this year, a Christmas goose is a fantastic alternative to the classic Christmas turkey. Award-winning butcher’s Farmison & Co in the UK have seen a 200% increase in their goose crown sales in comparison to last year, as well as a 100% increase in free range goose sales.
For all the goose novices who have no idea where to start, Farmison & Co Executive Development Chef Jeff Baker has shared his five golden rules for roasting a Christmas goose to perfection:
- When defrosting your goose for Christmas, you must ensure that you do this in the fridge and not near a radiator or in contact with direct heat.
- Make sure you remove all of the giblets and lobes of fat prior to roasting your goose.
- Be mindful of your oven space: apply the finishing touches to the rest of your meal while you allow your bird to rest for one hour after cooking — be as productive as possible and attend to your vegetables and gravy too.
- Baste the goose frequently while roasting, as basting will keep the breast meat nice and moist, whilst also intensifying the flavour.
- Be sure to pair your goose with accompaniments that will naturally enhance the flavour of the bird: we would advise fruity flavours, like a simple Granny Smith apple relish, or a festive chestnut and sherry sauce will tie the meal together well.
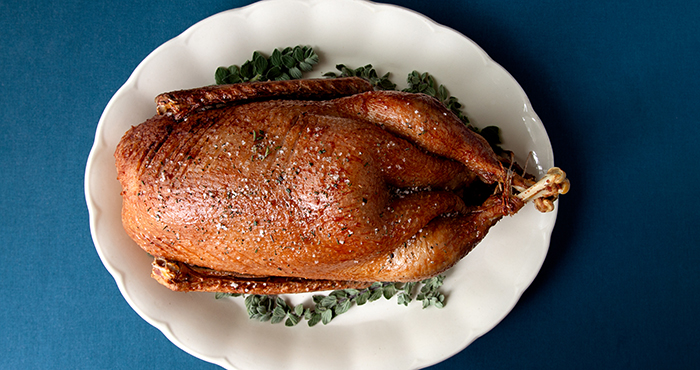
Need a step by step guide on how to get your goose to a royal standard this season? Read on to follow Jeff’s goose guide for first-timers!
How Jeff prepares his goose…
- To start, remove the two large lobes of fat at the opening of the cavity if that has not already been done. Simply remove with your hands and reserve — this fat adds great flavour to a variety of meats when roasting, makes excellent roast potatoes, or can be rendered down for frying.
- To render, slowly melt then simmer the fat over a low heat; then cool, strain and keep in the fridge for up to three months following Christmas.
- Remember to remove the giblets from the cavity; often they’re in a plastic bag, and this must be removed before roasting.
- The giblets can make great stock for Christmas gravy, or they can be poached in the goose fat until tender and rich — this creates a confit before frying over high heat. Why not serve this as on toast with chopped parsley and garlic?
- Your goose has a deep layer of fat under the skin which will need to be released when roasting. To achieve this, simply pierce the skin all over using a toothpick concentrating on the area between the breast and legs.
- To achieve crisp fat, I recommend starting the day before roasting. Scald the bird over a sink on a wire rack with 2-3 kettles of boiling water slowly poured over the bird. Pat dry and leave uncovered in the fridge overnight.
- Roast the goose on a trivet of vegetables or a wire rack in the roasting tin, so that the goose doesn’t boil and overcook in its own fat. The trivet makes a superb base for gravy to serve alongside your Christmas dinner.
How Jeff roasts his goose…
- On the day of roasting, massage with fine sea salt and a little oil and bring to room temperature.
- Preheat your oven to 180°C/160˚C fan/gas mark 4.
- Place the goose breast side up on a trivet of chopped onion, carrot and apples, in a large and heavy-based roasting tray — one with deep sides and handles for easy movement.
- Place the tray in the centre of the oven and roast for 20 minutes per 500g, basting the goose with its own fat as it roasts.
- To finish, increase the oven to 230°C/210°C fan/gas mark 8 and roast for an additional 15 minutes until the skin is golden brown and crisp.
- The core temperature should read a minimum of 65°C before resting.
- Remove from the oven, drain away excess fat reserving for another use, and place the goose onto a clean tray and keep warm by covering with a sheet of foil.
- Rest for a minimum of 30 minutes before carving.
- There’s nothing left to do but tuck in!


You have to be signed in to comment this post.