Working with fondant takes me back to the days of playing with play dough. Fondant can be sculpted into fun designs or can be textured to look like fur, wood or even wave. Cakes covered in fondant have a beautiful, smooth and almost porcelain-like appearance. Fondant is a great way to create a true showstopper cake for any occasion; however, the thought of working with fondant can be daunting. I myself have “feared the fondant” for a long time and have had my fair share of mishaps. I’m here to show you the basics and some of the common mistakes that can occur when working with fondant.
What is fondant?
Fondant, also known as ‘roll out icing’ or ‘sugar paste’ is made of sugar, water and corn syrup. It’s commonly used to decorate cakes, pastries and biscuits and is of similar texture to play dough. It can be moulded to endless shapes and sizes, creating edible creations. Fondant can be bought pre rolled or in blocks, white or coloured and can are found in supermarkets or cake supply shops.
Fondant storage:
Fondant can be last for up to nine months if stored correctly. Once the packet is opened it is important to store the fondant in an airtight container at room temperature. Once the fondant is exposed to the air it will begin to dry out and will not give you as smooth of a finish. When working with fondant, it is good to keep a zip lock bag beside you to keep your fondant in while you work, this ensures the fondant is covered and will help it from drying out.
Decorating with fondant
All about that base
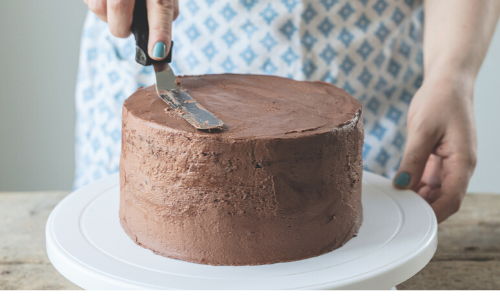
Before starting to work with fondant it is important to have a smooth base, whether it is sponge or biscuit cake it is important to have a smooth canvas before covering with fondant. Fondant can cover a number of sins but if the cake is not smooth it will show through. A turntable or even a ‘lazy Susan’ is a great investment when doing cake decorating as it gives you a 360˚ view of the cake. Ensure that the cake is level and even, use a serrated knife to trim any excess around the edges. Stack and fill your sponges with your desired filling, then cover your cake with a buttercream (a mix of icing sugar and butter). Using a pallet knife or offset spatula spread your icing over the top and sides of the cake, making sure to fill in any gaps. The first layer of ising is known as a ‘crumb coat’, as the name suggests there will be crumbs! Place your cake in the fridge to allow the icing to set. Once set, spread over the remaining icing until smooth and covers any of the crumbs. Smooth out the icing with a pallet knife and allow it to set in the fridge, this allows you to have a firm cake when covering with fondant. If the cake is still not smooth, put your pallet knife in some hot water and glide it over the icing as this will melt any of the bumps to give a smooth finish.
Keep it clean
After icing the cake, it is essential to clean your work surface of any crumbs. Any dirt or crumbs will stick to the fondant and will show through on your cake. Use a damp cloth to wipe the counter clean and dry with some kitchen roll, a tea towel will leave lint which will also show in your fondant. Once clean, it’s time to play with fondant!
Kneading

Similar to kneading any dough, it is important to dust your work surface to stop your dough from sticking. When kneading fondant, lightly dust your hands and work surface with corn flour or icing sugar, don’t use too much as it will dry out the fondant. I personally like to use corn flour so you can save your icing sugar for your buttercream. Knead with the palm of your hand for about 30 seconds to a minute; you will feel the fondant get smoother and more elastic. Once kneaded, mould the fondant into a ball for a round cake or a square for a square cake, this makes it easier to keep the shape when rolling it out. Cover the fondant with cling film or place in a zip lock bag to stop it from drying out.
TOP TIP
Take a clean pair of nylon tights, cut off the foot, fill with corn flour or icing sugar and tie a knot. Bounce a couple of times on your surface like a powder puff to dust before kneading or rolling your fondant. This is a great way to avoid using too much corn flour or icing sugar when working with fondant.
Working in Technicolor
Fondant comes in a large array of colours and can be found in cake supply shops, most supermarkets will only have it available in white. If you wish to colour your own fondant instead of buying ready coloured, cake supply shops sell gel food colouring. At the kneading stage, add the colouring a dot at a time and work it into your fondant. The kneading process may take a little more time as you are working the colouring all the way through to create a solid colour. Liquid food colouring is available in most supermarkets which will work but the end colour won’t be as vibrant.
Size matters
To ensure you have the right width of fondant, take a piece of string to measure across the top and sides of the cake. Cut the string to size and keep it for later as a guide.
Roll with it
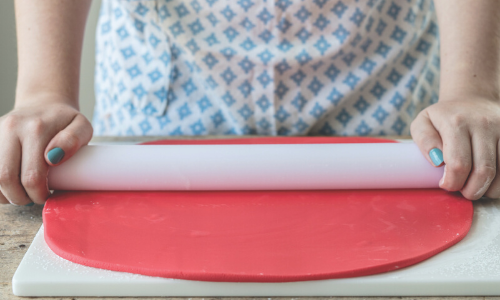
You will need a non-stick surface or food safe mat to roll your fondant. There are specific mats for fondant that have helpful grid lines for precise sizing, they are made from silicone and lie flat on your work surface. Dust your surface with some corn flour or icing sugar to stop the fondant from sticking. I like to use an ordinary wooden rolling pin but you can buy non stick rolling pins, both work perfectly; just remember to dust it with some icing sugar or corn flour. When rolling out fondant it is important to work quickly as it can dry out, tear or crack. Remember to keep turning your fondant to have an even roll. The fondant should about 1/8 inch thick, a little thicker is okay but if the fondant is any thinner it will tear. Use the string that was measured earlier to ensure there is enough fondant to cover the cake.
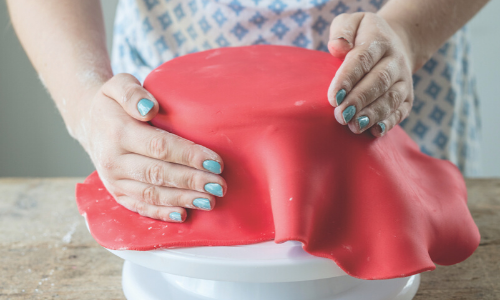
Lift off
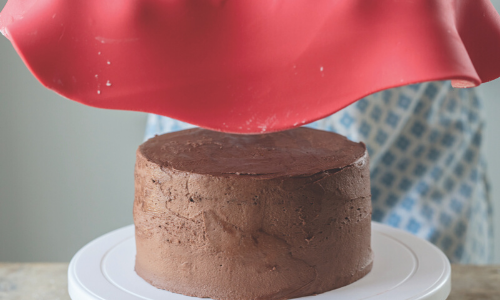
Remove your cake from the fridge and brush it with some water so the fondant can stick. Slide your forearms and hands under the fondant to lift the fondant onto the cake. Use your arms as a centre point, lift the fondant just above the cake until your arms are in line with the centre and gently remove your arms out to either side to allow the icing to fall onto the cake. Another method which I prefer, is to roll the fondant onto the rolling pin and drape it over onto the cake, however this takes practice.
Rub a dub dub
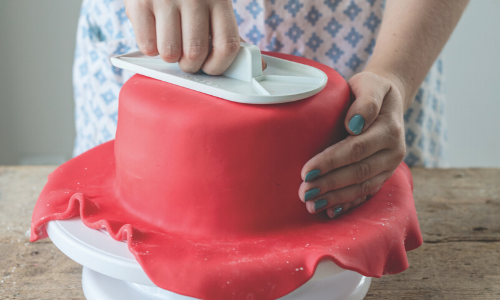
Once the fondant is on the cake, use your hands to carefully smooth the top edge, it’s important to work from the top down and to work using upward strokes. Smoothing downwards can put stress on the fondant and cause it to tear. There will be folds in the fondant where it overlaps, gently stretch it out and using the palm of your hand press it onto the cake. Continue this process the whole way around until the cake looks almost smooth. You can buy cake smoothers in any cake supply shop. While still working in upwards strokes, use the cake smoother to smooth over any bumps.
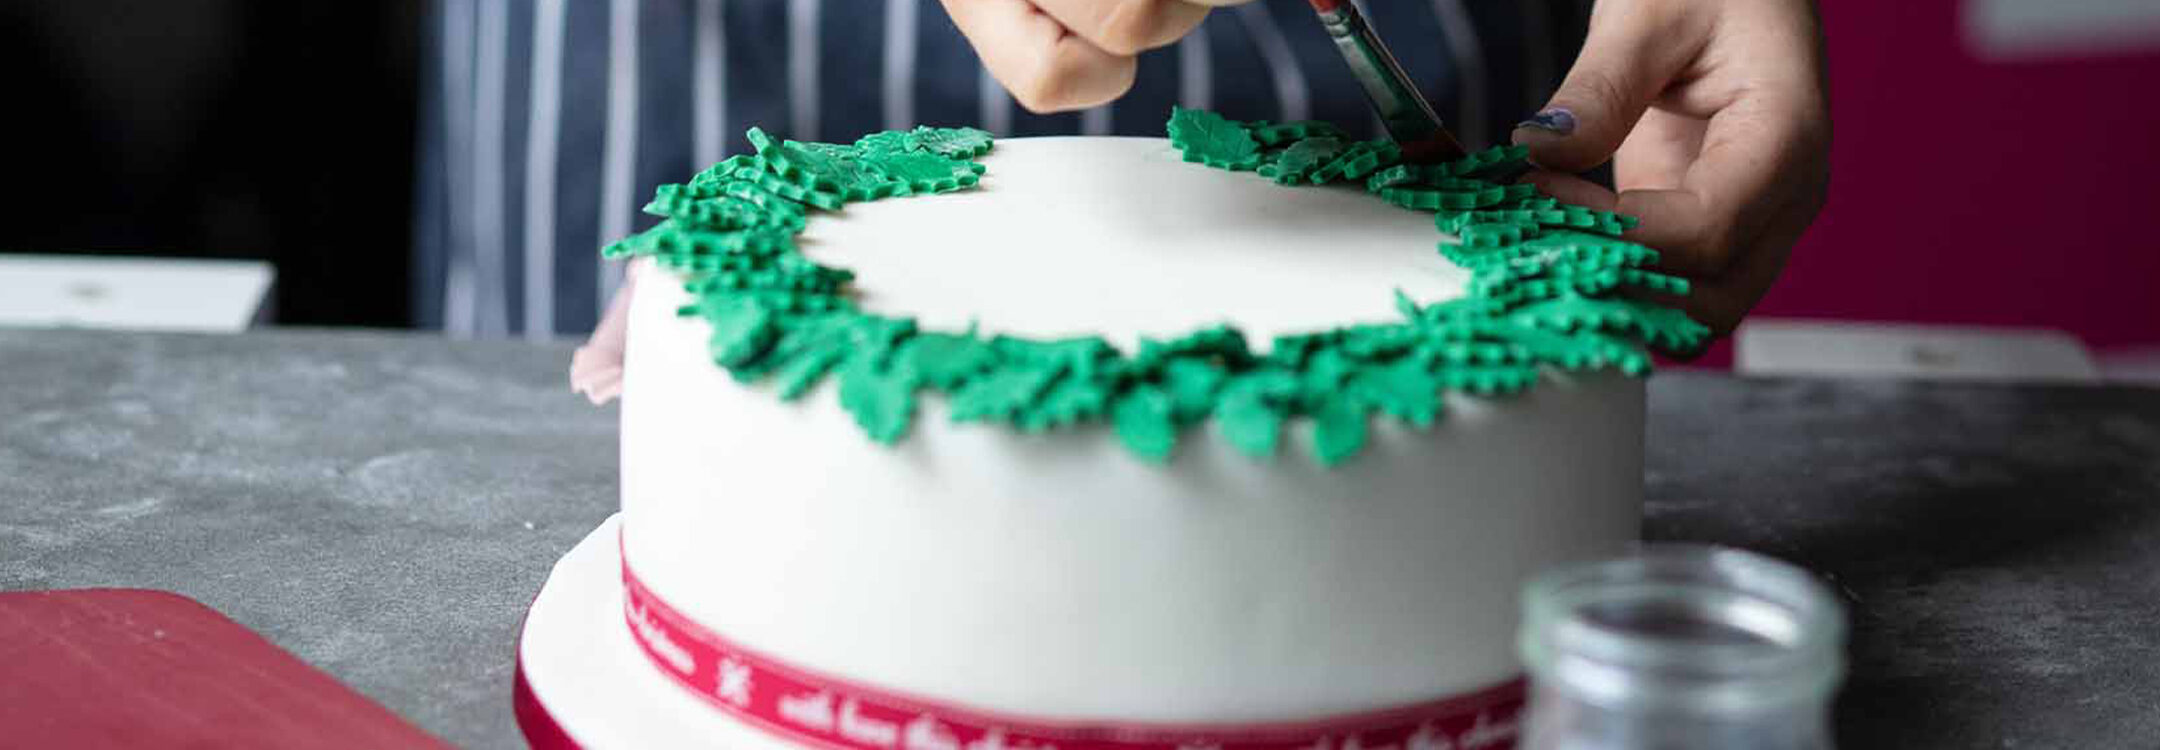
Fondant Fun
Now you can get creative with different cutters, ribbons, molds and even molding your own creations. Using online tools like Youtube, Google images or my favourite, Pinterest is a great way to find step by steps and inspiration. Similar to using play dough as kids, if you make a mistake, squish it back to a ball and start again.
Fondant Flops
- Air bubbles can often occur under the fondant resulting in bumps on the cake. Insert a small pin into the bubble, press the fondant gently to release the air and flatten the surface.
- Dry fondant is a common problem, its all about working quickly as it can result in cracks on the surface of the cake. If you find your fondant is dry when kneading, adding some “trex” (vegetable shorting) can prevent it from drying out. Avoid adding too much cornflour or icing sugar.
- Elephant skin are the wrickles that appear on the top edge of the cake, a common problem due to dry fondant. By rubbing some vegetable shortening on the wrinkles can help reduce the appearance
- Bumps and dings can easily happen by accidentally dinting the fondant with a nail or a tool. Take a small piece of the same colour fondant as on the cake and mix with some water to make a paste. Smooth onto any marks and allow to dry to help hide any imperfections.
For some more of our cake recipes check out https://easyfood.ie/?s=sponge
- summer events
- small business
- gut health
- OATLY
- festival Ireland
- healthy
- Crudo
- food & culture
- top tips
- All Together Now
- events Wicklow
- fridge cake
- Events Waterford
- music & arts festival
- me auld flower
- Events Ireland
- Wicklow Events
- food festival
- news
- dublin
- events Dublin
- dublin festival
- Home-Cooking
- food and drink festival
- online cooking course
- festival line-up
- cooking
- Summer festival
- eco-friendly
- Events
- cosy
- Festivals Ireland
- wine
- Body & Soul
- grapes
- music festival
- south africa


You have to be signed in to comment this post.